Get Gigabytes Of Storage Back On Your Steam Deck With No Change To Gaming Performance
The Steam Deck has been a very exciting gaming device. If you noticed your internal storage shrinking, checkout how you can get a ton of…

The Steam Deck has been a very exciting gaming device. I have actually put more gaming time into that device compared to any other device. However, there has been an issue with storage. Now, that’s mostly because I picked the 64GB version since I didn’t know if Valve would actually support the device — which they have. Nevertheless, there’s something you can do to get gigabytes of storage back on your Steam Deck, and that’s moving a folder that shouldn’t impact your gaming performance at all.
You see, when proton installs games, it installs a Wine environment for each game, including everything that’s needed… including any launcher files. As you install more and more games, even if you install them on the SD card, they will place more and more files on your internal storage. This is NOT needed, especially if you don’t install games on your internal storage.
If you have multiple cards, that’s fine. When you place in an SD card it will just place the files associated with the games on that SD card in the compatdata folder for that SD card. Now, you WILL need to make sure if you insert a formatted SD card, that you create that compatdata folder. But with the 15GB of storage I got back, I had no problem with doing that.
Will this impact gaming performance? No, we are moving the WINE environment and launcher files, these are just needed for an initial launch and that’s it. If we were moving the shadercache that would be another story. That will just need to eat up storage until Valve properly finds a way for us to clean that up when not needed anymore.
To get started, you will need to launch the Desktop Mode:
- Press the Steam Button, then select Power.
- Select Switch to Desktop.
- Wait for your Steam Deck to switch to Desktop mode.
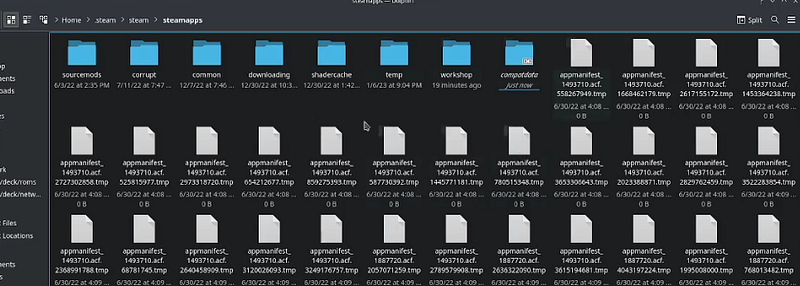
Open the Dolphin file browser and navigate to your Home directory, you should see something similar to this:

You should see a .steam folder, if not click the 3 line menu icon in the top-right corner of the window and check the “show hidden files” checkbox. It should then show on the screen.
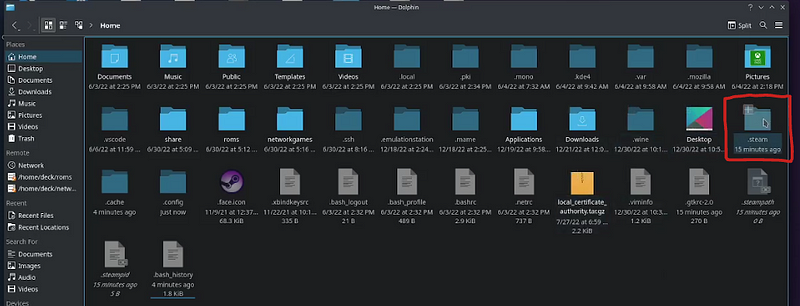
Then navigate to the steam folder. This is actually a link to another folder, but this is a shorter route to take.

Next, open the steamapps folder.
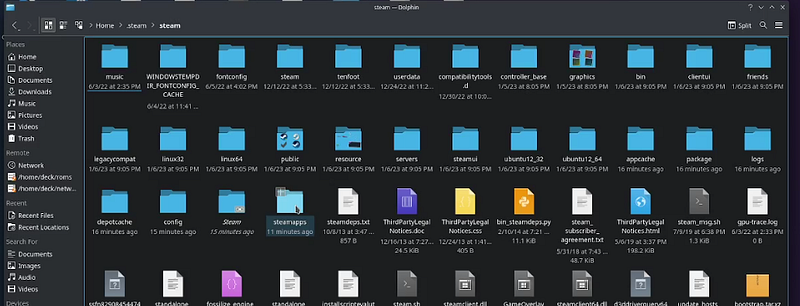
You should then see a compatdata folder. You will need to cut this folder and paste it onto your SD card. Depending on how big this folder is — and the speed of your SD card — this could take a couple minutes.
Once done, head back over to the steamapps folder. In that folder, you will need to right-click any empty space to bring up a menu. Under Create New there will be an option for Link to File or Directory , select that option.

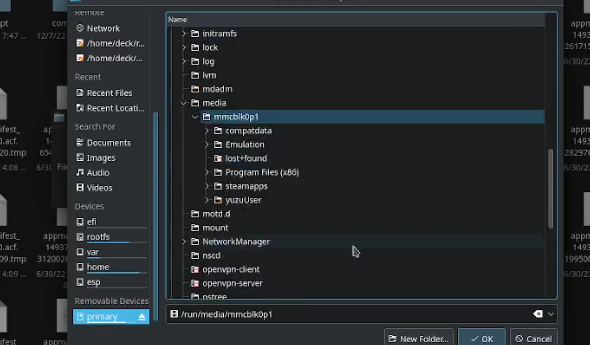
In the Dolphin Symlink window that comes up, file in compatdata as the Name. Click the button to the far right of File or directory to link to and select Directory .

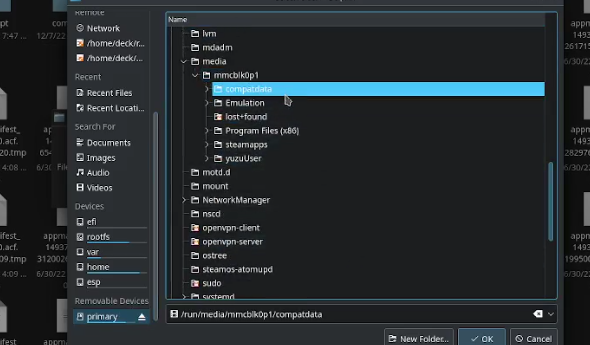
On the far left side of the window, scroll to the bottom under Removable Devices and select your SD card — which should be primary . From there, on the right side, select the compatdata folder you moved to your SD card.
Once that is selected, click OK .
Now verify everything looks correct in the Create Symlink — Dolphin window and click the OK button.

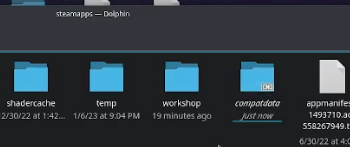
The compatdata folder in your steamapps folder should now have a link icon in the bottom left showing that it is linked somewhere else — your SD card.
That’s it, now you can go back to the Steam Deck UI by Double clicking the `Return to Gaming Mode` on the desktop.